The application of grans onto a surface using fusion.
We have to fuse the grans because the point of contact is so small that the solder fillets would
have to be almost microscopic, and it would drive us insane trying to get the solder in the right
place at the right time. So the result is more beautiful if we fuse. This does create some
problems. The temperature that the metal fuses at is just below the melting temperature.
Carbon created by the oxidation of the hide glue remains on the surface between the grans and
the base. This carbon creates an area with a slightly lower melting temperature than the metal
itself. Any bezel's or borders must be fused as well, before the granulation is fused.
Step 1. Draw down fine silver wire to 26 and 30 gauge.
Step 2. Using a small paper clip as a mandrel, make lots of small jump rings.
Step 3. Put charcoal block onto on a small fire brick inside and then into a glass pie plate, put about 1/4" of water in plate.
Step 4. Spread the jump rings out evenly on the charcoal block, spaced about 1/4 " apart, and heat until they turn into little spheres or grans.
Step 5. Tilt up the block and the grans will run off, Repeat until the desired number of grans
have been made.
Step 1. Die-form or dome sheet.
Step 2. Polish metal now as you will not be able to after granulation.
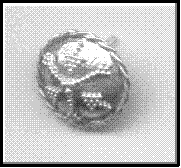
Step 3. Apply border wire around the outside, this is both decorative and functional. The border keeps the grans from rolling off of the piece and accents all the little spheres.
Step 4. Also if you want to mount a stone the attached the bezel now.
Both the bezel and the border need to be fused. First fuse the wire together and then fuse it to
the surface. This process is very similar to soldering, apply glue(see below) mixture to contact
points heat until contact points flash, that's it, no cleanup! Just don't overheat.
Step 2. Using the following formula make your glue: 2 drops hide glue, 2 drops flux, 12 drops distilled water.
Step 3. Apply grans by dipping brush in glue mixture and then picking up a gran and putting it in place according to your design. After the grans are in place if you need to move them around moisten the brush with water, as you do not want to use too much glue.
Step 4. Let dry on top of kiln, and then put the piece onto the preheated kiln and cover until it glows a bright red.
Step 5. Put a small tip on your torch and set the regulator for a reducing flame. Move the flame
across the surface never stopping. Watch for the space between the gran and the sheet to flash,
this happens very fast and if you heat the piece for ½ a second to long it will turn into a puddle.
Once the all the grans have flashed your done, air cool the piece and finish.
 cut things to the exact size and solder precisely, with no clean
up necessary. Be careful when pickling, place the piece in the pickle,
don't drop it in.
cut things to the exact size and solder precisely, with no clean
up necessary. Be careful when pickling, place the piece in the pickle,
don't drop it in.